You have an expensive top-of-the-line camera, but still, half of your photos turn out shaky, dark, or just disappointing.
You don’t need to stress; this is a common problem that often occurs in the journeys of almost all beginners.
The issue is not the camera, but just a couple of common photography mistakes that can impact your photos.
It is not a thing to worry about; these mistakes are easy to fix, just a few fast and simple solutions to instantly upgrade your photography.
Before we start, if you’re new to photography then checkout our latest guide on Complete Photography Setup Guide for Beginners in India 2026.
Technical Camera Settings Mistakes
Here’s a list of 10 common photography mistakes, which you can read from this article and avoid making as a beginner photographer…
Mistake #1: Using Full Auto Mode All the Time
The problem with Full Auto is that it treats every scene the same way, but the lighting conditions in India aren’t obviously the same.
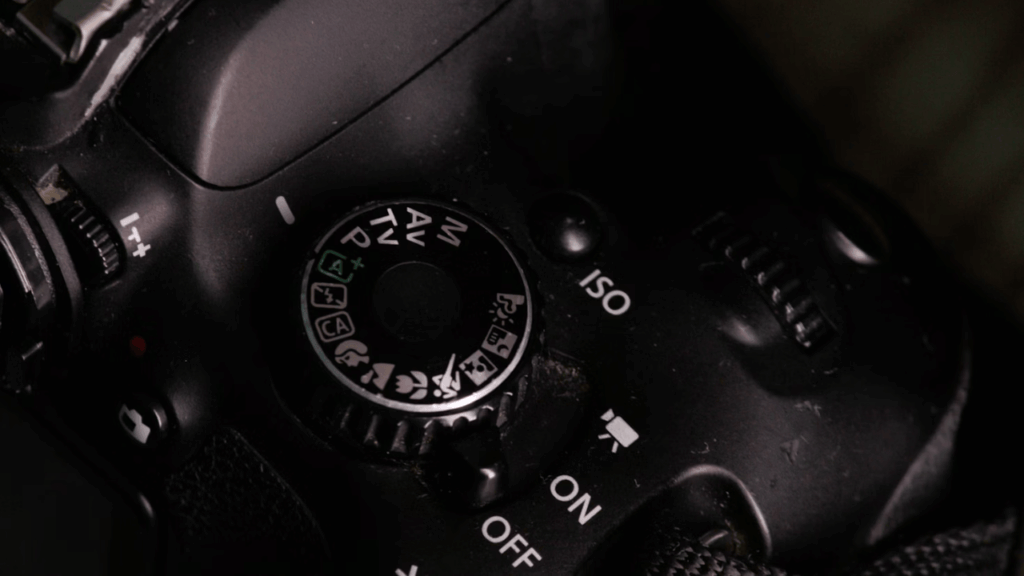
Auto can’t keep up with the lighting conditions present in India, such as bright noon, colourful markets, dim indoor rooms, etc.
The fix for this is to switch to the aperture priority (A/Av), which can give you control when it matters.
The f/2.8-f/4 can help with the portraits, and the f/8-f/11 can help with the landscapes, buildings, and even travel shots.
Mistake #2: Not Checking Your ISO Settings
Not checking or using the wrong ISO can have a negative impact on the work of a photographer.
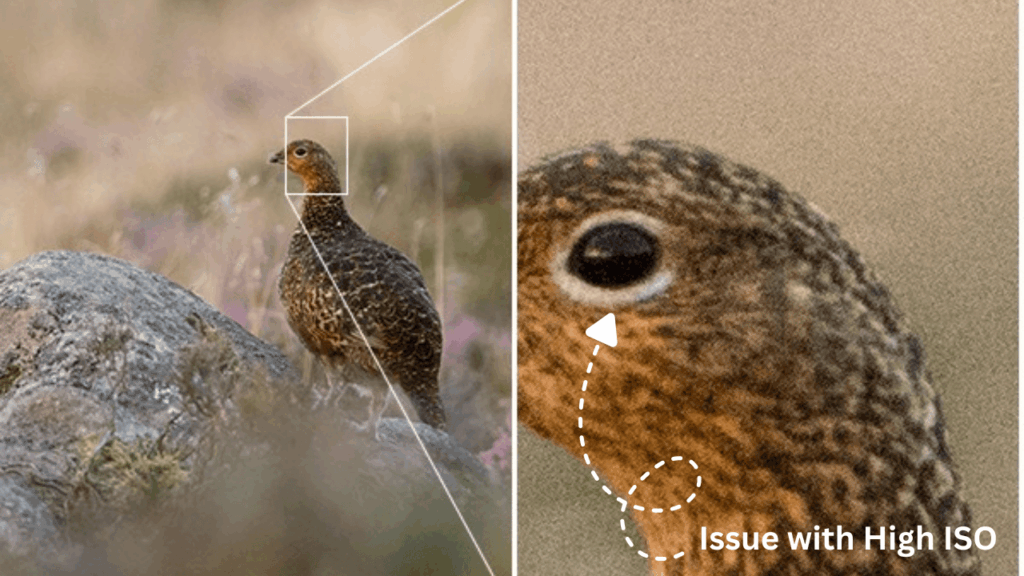
Using a high ISO in the bright indoor shoots can lead to noise and reduced clarity, which is a common problem in India’s harsh sunlight.
Remember to check and reset the ISO settings after each shoot.
The solution to this problem may be that ISO 100-200 works best for daylight and outdoor situations, ISO 400-800 works best for indoor or cloudy weather, and ISO 1600+ works best for low-light conditions and nighttime events.
To avoid using the wrong ISO, you can make checking the ISO a part of your pre-shoot routine.
Mistake #3: Shooting Everything at Widest Aperture
A wide aperture can work well for portraits, but if you use it for each shot, it can result in soft corners and missed focus.
In group shots, a wide aperture can cause the faces of a few people to become blurry.
Now, the quick fix for this problem is using different apertures for appropriate situations.
The aperture f/1.8-f/2.8 works best for portraits, food, and images that demand details.
The f/4-f/5.6 is the best for travel, street, and capturing the moving shots, and the f/8-f/11 works best for group shots, landscapes, etc.
Mistake #4: Ignoring White Balance Settings
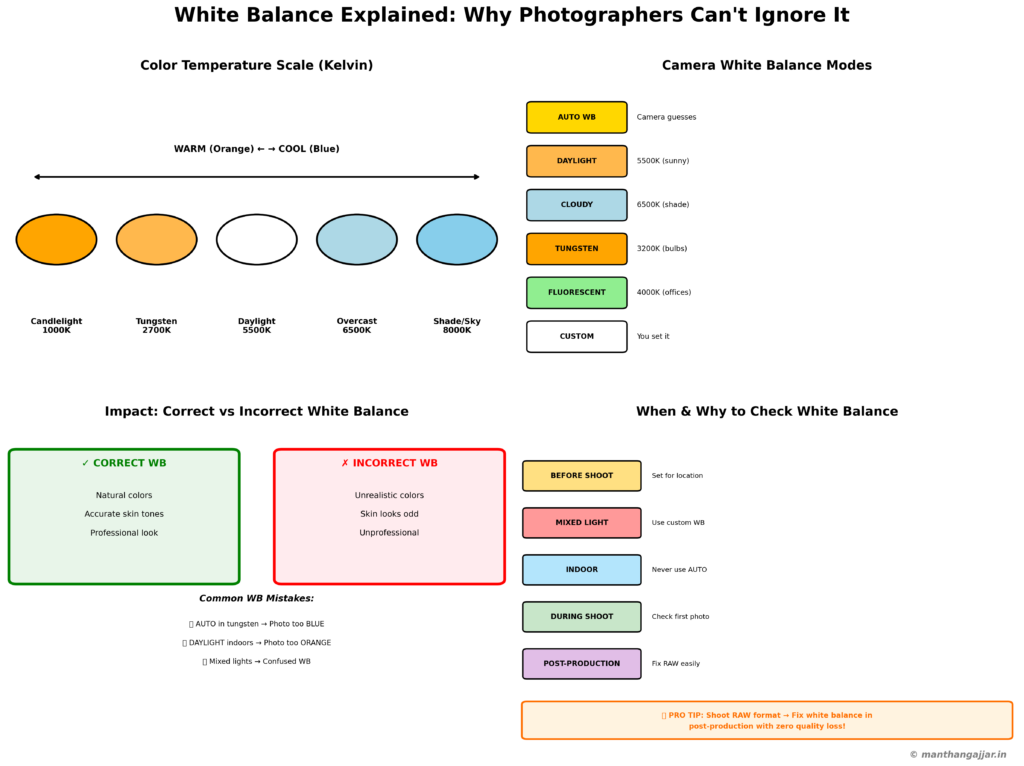
As discussed earlier, India’s lighting can change drastically, such as the orange/yellow tubes indoors, the bluish shades of the trees, the warm evening sunlight, etc.
But using the auto white balance for all these situations can result in the photos looking orange or blue.
The fix for this problem could be to set the white balance based on the scenes you want to capture.
Using tungsten for yellow lighting, shade for blue tint, cloudy for neutral and daylight for the harsh sunlight.
You can even use RAW (Know in-depth about RAW vs JPEG) and later correct the white balance during the editing process.
Mistake #5: Shooting JPEG Instead of RAW

The biggest problem with JPEG is that it can compress your images and reduce the detail to a great extent.
But in India’s high contrast settings can drastically limit the ability to fix the exposure or the colours in the editing process.
The solution for this problem can be to shoot in RAW, which can give you flexibility to an extent.
RAW mode can definitely capture in more detail, has a better dynamic range, and can even allow editing without damaging the image quality.
Composition and Framing Mistakes
Now you know what kind of image type you need ot choose before you go for a shoot, camera settings, aperture, etc, but you also need to understand framing and some important techniques like composition.

Let’s understand each common camera mistake that you can avoid while framing your subject…
Mistake #6: Always Centring Your Subject
Another mistake that beginners commonly make is centering the subject, which can make the images look plain, flat, and even static.
When the subject is in the middle, there is no depth, and the viewer has nowhere to look.
You can fix this problem by shifting your subject.
You can use the rule of thirds, which suggests that you can place your subject on the left or right of the frame.
This can certainly create a movement in the images.
An Indian example could be if you want to capture the Taj Mahal, you can shift the monument and capture the gardens or sky as well.
Mistake #7: Cutting Off Heads, Hands, and Feet
Another one of the most common mistakes made by photographers is chopping off someone’s head, hands, feet, or forehead.
This can make the work feel amateurish, rushed, and even thoughtless to an extent.
The fastest way to fix this kind of common camera mistake as a photographer is that you need to learn safe cropping zones.
You should also learn to avoid cropping at the joints.
You can try and crop mid-thigh, mid-torso, or include the whole body.
It can also be advisable to leave some space above the head to avoid a ‘boxed-in’ look.
Mistake #8: Ignoring Messy Backgrounds
Sometimes a messy background can overpower the subject.
This is a common problem in India, as there are a lot of distractions such as wires, poles, signboards, crowds, etc.
Some ways to fix this problem are to change the angle slightly and avoid the distraction that is entering the frame.
You can also use the walls, trees, or neutral colours as a background.
There is also the option to shoot with a wider aperture to blur out the messy scenes.
Important resources
- Vanishing Points in Photography | Composition Tips To Get Bangers
- A Beginner’s Guide to some of the best Photo Composition Techniques
Lighting Mistakes That Ruin Photos
Even if you’re a pro at photography and have already conquered all the mistakes mentioned above, the following ones are still easy to make without even noticing. (I still make them sometimes too 😄)

Yes, it’s about setting up your lights or understanding your lights before you begin your shoot.
Mistake #9: Shooting in Harsh Midday Sun
In India, shooting in the hours between 12 PM to 3 PM can destroy a photograph and create the classic problems such as dark eye sockets, oily-looking skin, washed-out colours, etc.
The best cameras and the most professional photographers can struggle to capture good pictures in the harsh and top-down light.
The easiest way to fix this problem is to choose the softer and flattering light.
Which can include morning 6-8 or evening 5-7. Lighting during these times can be warm and give a soft glow.
Another option is to locate your subject under a tree, near a tall building, shade of a wall, etc.
You can even use reflectors; if you don’t have one, you can use a white dupatta, a scooter sunshade, aluminium foil, etc.
Mistake #10: Using On-Camera Flash Directly
Direct flash is the worst thing that can happen, it can create a hard, flat, washed-out look of the subject.
The solution to this problem can be bouncing the flash.
If you are using an external flash, you can point it at the ceiling or a wall to soften it.
In India, there are windows; you can turn off the LEDs and let the natural light do the job.
You can even try to soften the flash by putting a small piece of white tissue over the flash.
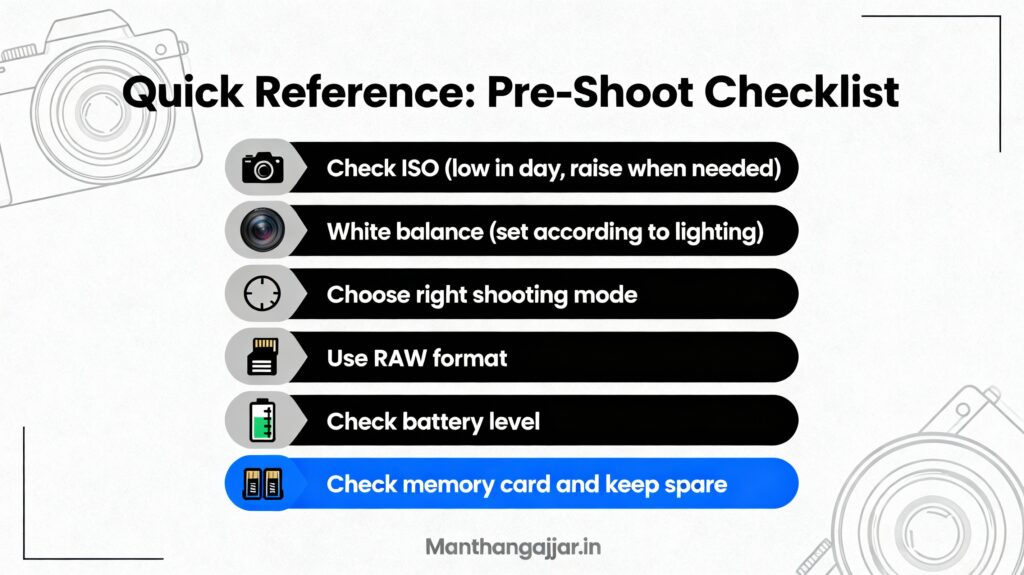
Quick Reference: Pre-Shoot Checklist
Let us see all the things you need to check before a photoshoot for the best possible results.
Common Photography Mistakes FAQ
Here are some of the frequently asked questions from photographers around this topic…
What is the most common beginner photography mistake?
The most common camera mistake is using the full auto mode. In this mode, the camera decides everything, and the photographer relies too much on it.
The auto mode can sometimes misanalyse the surroundings and choose the wrong settings, such as exposure, ISO, and especially in the harsh Indian sunlight.
You can just switch to Aperture or Shutter priority, which gives you more control.
How do I avoid blurry photos?
There are a lot of settings that can be used to avoid blurry photos.
You can start by adjusting your shutter speed. To avoid blurry images, you can use a faster shutter speed.
You can use a shutter speed such as 1/50, and for fast-moving objects, you can use an increased shutter speed such as 1/250 or 1/500.
Try to increase the ISO in low light to maintain that fast shutter speed. The image stabilization can also be used to increase the sharpness.
Should beginners shoot RAW or JPEG?
RAW is the better option as compared to JPEG for beginners. RAW can capture images with great detail, can preserve highlights and shadows, and allows flexibility during the editing process.
RAW is the best suited for India’s high contrast and colourful scenes.
JPEG also has its own benefits, such as it is convenient for sharing, but it can compress the data.
You can even use a hybrid mode such as RAW+JPEG if you have enough space available.
Know more in detail: RAW vs JPEG | Are Raw Images Sharper Than JPEG? With WHY.
Conclusion: Start Taking Better Photos Today

A few common photography mistakes can have a huge impact on the photos.
You can have great images just from smart habits and the knowledge, and not only the expensive gear.
Start with the most common photography mistakes, such as the ISO, the right shooting mode, and pay attention to the lighting.
After these, you can keep on practicing and reviewing your shots again, and keep on going until you are satisfied.
You can even ask the opinions of others on your work, and even join local photography clubs to keep the inspiration and practice.
Read more
- Photography Equipment Checklist for Beginners: From ₹30K To ₹1.5L
- Best Photography Lenses for Beginners in India 2026: Complete ₹5K-₹20K Guide
- TOP 5 Creative Indian Photographers To Follow On Instagram In 2026
- 7 Best Cameras Under ₹50000 in India | Top Picks Of 2026
- Best Camera Phones for Photography in India 2026
- Camera vs Smartphone Photography: Buyer’s Guide for India 2026