Is Manual mode the golden key to achieving the best photography skills? Or you can’t capture good photographs if you don’t know manual mode?
Or some of the expert photographers say if you don’t know anything about manual photography, then you don’t know photography !!! Is that right or not?
If you are asking me about yes or no, then it’s 50-50%.
You can capture good photographs using some other modes like Creative Auto, shutter-priority, etc.
But if you learn manual mode, then you can capture, no matter what type of condition out there in the real world, you can capture anything.
Follow my Pinterest Boards to get the latest updates/reviews and news related to photography.
So if you are one of the so-called ‘newbies‘ in this little photography world and want to know the real answer related to manual photography or manual mode, then the next 5-7 minutes will give you proper knowledge and skills related to manual mode.
Now, without talking more about manual mode, let’s understand manual mode under the hood.
Manual Mode Photography: Complete Beginner’s Guide (2026)
To learn manual mode or anything else, first you must have curiosity or excitement about learning something new.
Without these two things, you won’t be able to get the result that you really desire or imagine in your mind.
So before you learn manual mode, you just need to know why manual mode is Necessary.
Some of our readers may be asking me the same right now !!
What Is Manual Mode and Why Should You Learn It?
If you are a beginner and have just purchased a new camera, you are missing manual mode.
By using this mode, you can learn a lot of new and interesting things, like
how to use auto or manual focus. What is shutter speed? when to plus-minus ISO and aperture, and lots of other factors.
know why manual mode is important
When and Where to Use Manual Mode
If you want to capture photographs the way you want or imagine, then you need to use manual mode, as simple as that.
Almost everywhere, if there is too much light or too much dark, or when you want to capture too quickly or too slowly at that time, you can use manual mode.
The Quick Guide To Manual Mode
It’s too boring if you learn the tough part first.
Hence, I divided this article into three subparts, each of which contains some important features of manual mode.
The first one is too easy to learn, the second one is a little bit hard, and the third one is the hardest.
Don’t worry, if you just follow these steps and practice every single day, then this hardest part will also be easy for you.
But remember, you need to practice a lot to reach a professional level and capture the images you imagine.
In this article, I used Canon 1300D (now I own Sony Alpha A6000 ), if your DSLR camera contains more features than this DSLR camera, then let me know in the comment section.
Stage 1: Easy Settings to Get Comfortable First
This stage includes some basic features of manual mode, so if you are aware of it, then you can just skip this stage and read stage 2 and stage 3.
To set some styles for your photo, you can use this feature.
This feature contains styles like auto, landscape, portrait, standard, etc.
White Balance: Stop Getting Orange or Blue Tones
There are lots of different options available in white balance.
It’s like a different kind of filter.
This feature contains filters like auto, Daylight, Shade, Cloudy, Tungsten light, White fluorescent light, flash, and custom
Find some good examples of white balance.
How to Use the Built-in Flash in Manual Mode
To turn on or off your camera flash, if you don’t have an external flash.
Flash Exposure Compensation Explained Simply
If you are capturing photographs at night, then this feature is for you.
Using this feature, you get some options like (-2 to +2 ).
If you set it to -2, then you get a dark type of flash, and if you set it to +2, then you get the too-bright shadow.
Just capture some photos using this feature, and you’ll understand it quickly.
This feature is also best when using the external flash.
learn how to use Flash Exposure Comp. in depth
Auto Lighting Optimizer: Should You Keep It On?
There are a total of five types of auto lighting optimizers available: disabled, low, standard, and high.
If you want to know how this works, “in short,” then it makes dark photographs into bright ones using these different options.
So set it as your requirement to capture good photographs.
Learn More About Auto Lighting Optimizer
Drive Mode and Self-Timer: More Useful Than You Think
If you want to capture a family photograph including you, then using this feature, you can do it.
This feature contains some other shooting modes like single shooting, continuous shooting, self-time – 10 sec or 2 sec, self-timer: Continuous
Stage 2: The Core Settings That Control Your Exposure
This is where manual mode actually begins. Stage 1 was about getting comfortable.
These settings are what give you real control over how your photo looks.
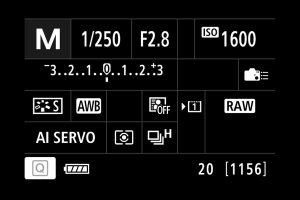
ISO, shutter speed, and metering mode work together to decide how much light hits your sensor and how your camera reacts to it.
Get these three right, and everything else falls into place.
ISO Explained: From ISO 100 to 6400 (and When to Use Each)
When you get something very dark or bright, then using ISO, you can make it on one level.
There are two parts of ISO, one is low range ISO(between 100-800) and the other is the high range ISO(between 800-6400).
If you are capturing something very bright, then low-range ISO is the key to making your photograph good.
Or if you are capturing something really dark, then high range ISO makes it bright, using a range between 800 and 6400.
So, in short, if you want to make your image brighter, then use high-range ISO, and the opposite for dark images.
But wait, there is one problem: if you use more ISO, like 3200-6400, then it makes your photograph less sharp, so it’s not good.
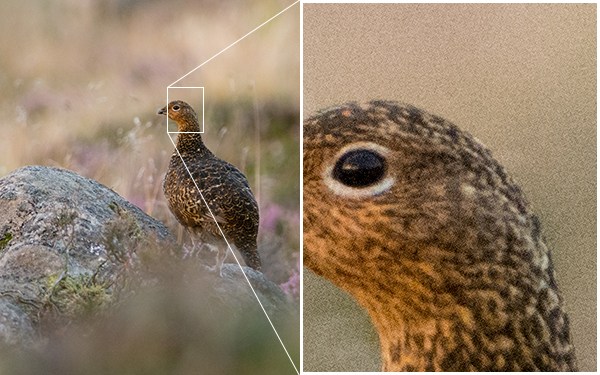
So always try to make ISO between 400 and 800 to capture sharp images.
Want to know more about ISO & Shutter-speed – learn ISO & Shutter-speed in Depth
Shutter Speed: From 30 Seconds to 1/4000 | When to Use What
This is also one of the significant factors.
If you want to capture too quickly or even if you want to capture too slowly, then using this feature, you can do it.
In simpler language, if you want to capture any Moving car or any object that moves too quickly, then you can use this feature.
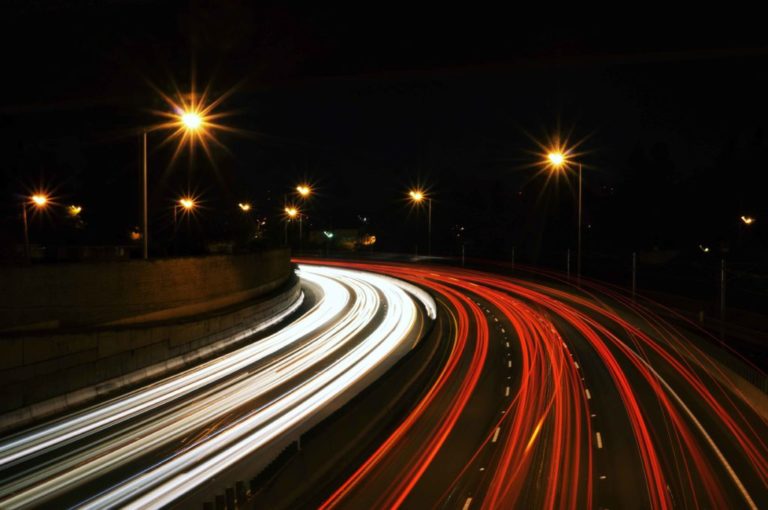
Or even if you want to capture long exposure-type photographs, then you can use this feature.
Basically, this feature is called “Shutter + speed,” so set your speed to set the camera shutter.
The range of this feature is from 30 sec to 1/4000 sec, which is way faster.
One main thing about using this feature is that you can capture some awesome waterfall photographs.
Metering Mode: How Your Camera Reads Light
There are three different types of Metering modes available in this camera: evaluative metering, Partial Metering, and Center-weighted average.
All these metering modes are useful to meter the lights that the camera sees through the lens into your camera.
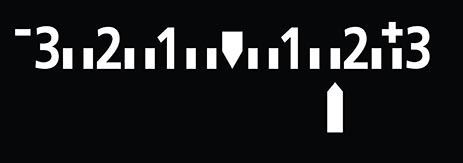
If the light is too bright, then it goes “+” side, so now, when you capture any photographs, just see through your viewfinder to see that + pr – arrows at the bottom of your screen.
Know more about Metering Mode.
AF (Autofocus) Mode: Which One to Use and When
There are three different operations available.
These only work while you are capturing photographs using autofocus.
One-Shot AF: Best for Stationary Subjects
This operation is useful if you want to capture a moving subject.
AI Focus AF: Automatic Switching Between Modes
AI stands for Artificial Intelligence, so basically, this AI gets the difference between your camera lens and the subject.
After getting the perfect result, it’ll capture sharp photographs.
This feature is useful if that particular subject is staying in one position and is ready to move.
AI Servo AF: Continuous Tracking for Moving Subjects
This feature is useful if your subject is moving too quickly.
It’s really hard to capture moving photographs using this feature.
I tried this thing with my Canon 1300D, and it’s not working properly(AI focus also), so if you have a good lens, then you can try this technique.
I found an interesting video related to this topic. If you want to know more about this operation, then watch this video.
May you like this
- Some Awesome Photography Hacks to Impress Your Friends
- 7 Crazy Photo Editing Apps you need to know to grow your Instagram
Stage 3: Fine-Tuning Your Shot for the Best Results
You’ve got your exposure locked in. Now it’s time to refine. Stage 3 is where most beginners stop paying attention.
And it’s exactly why their photos look almost good but not quite.
Aperture, white balance, and image quality settings are the difference between a photo that’s correctly exposed and one that actually looks great.
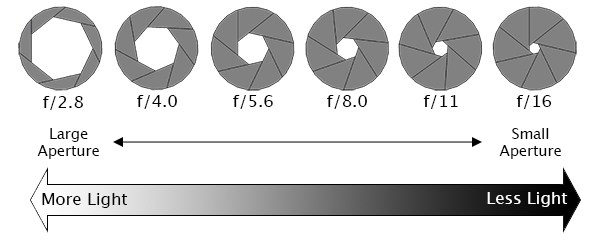
Aperture: Control Depth of Field and Background Blur
Essentially, we count aperture in F steps, range: f/2.8 to f/16 (for an entry-level DSLR camera).
In one of my articles, I said, ” The aperture is the size of the opening in the lens through which light is allowed to pass whenever the shutter is opened – the larger the aperture, the more light passes through.”
See this image to know more…
Know What is Aperture in depth
Auto White Balance (AWB): When to Trust It and When Not To
This is also one of the most important topics, which makes the manual mode a little bit harder.
Primarily, AWB stands for Auto white balance.
The Auto White Balance (AWB) setting helps your camera “guess” the best option or choose the one closest to what your eyes might see.
As we know, our eyes can see even better than a camera lens, so if you want to capture something awesome (which your eyes can see) with your camera, then you need to use AWB.
This feature sets automatic white balance, and hence the name AWB.
See how it works and when you can use AWB
Image Quality Settings: RAW vs JPEG for Indian Photographers
These things matter if you want some quality in your photographs.
There are lots of other types of photo sizes available when you check out manual mode.
Every single photo size takes a different amount of MB to store photos on your memory card; by default, it’s JPEG.
One suggestion – if you own a 16GB or more then 16GB memory card, then select photo size “RAW”.
There are a lot of factors available that make your photo quality far better when you select the RAW type.
Know why RAW Image Quality is 10x better than JPEG (for only professional Photographers).
Bonus Tip: The One Setting Most Beginners Overlook
You’ve made it through all three stages. Most beginners never get this far, they stay on Auto and wonder why their photos don’t look the way they imagined.
Manual mode isn’t something you master in a day.
But every time you go out and shoot, it gets a little more instinctive. ISO, shutter speed, aperture, these stop being settings you think about and start being things you just do.
The one thing most beginners overlook? Practice in one location first.
Pick a single spot, your terrace, a window, your street, and shoot there in different lighting conditions.
Same place, different light. That’s how the settings start to click.
If you want to go deeper, check out the full guide on mastering your DSLR camera with real examples, step by step, under 15 minutes.
Now go shoot. Manual mode is waiting.
Read more
- How to Choose Your First Camera in India | Beginner’s Guide
- Home Photography Studio Setup Guide for Beginners in India (2026)
- LED Ring Light Under ₹5,000 in India | Top 5 Picks for Creators
- Ways To Earn Money From YouTube In India | Under 6 Months*
- Best Photography Lenses for Beginners in India 2026: Complete ₹5K-₹20K Guide
- Gimbal Guru: A Comprehensive Review of the Best Gimbals | 2026
- Mobile Photography Tips And Tricks To Capture Stunning Photos
- Photography Equipment Checklist for Beginners: From ₹30K To ₹1.5L